

Ensure your cigars thrive with effective cabinet insulation. Discover how to maintain stable humidity and protect your collection year-round.
The best approach to cigar cabinet insulation is a uniform, vapor-tight, closed-cell thermal envelope lined with Spanish cedar and paired with calibrated humidification and circulation. Get that combination right, and your cabinet holds relative humidity within a tight band year-round, regardless of what the furnace or the front door does to the room around it. Get it wrong, with gaps in the foam or a wall you never tested for dew point, and you are building a slow, quiet threat to every cigar inside.
Three things to do before you buy a single board of foam:
- Check dew point risk on any exterior wall. If your cabinet or walk-in backs onto an outside wall, that surface can drop below the dew point in cold weather and sweat, inviting mold into your collection.
- Choose closed-cell insulation, not open-cell. Closed-cell rigid boards or spray polyurethane act as both thermal barrier and vapor retarder, which is exactly what a humidity-holding cabinet needs.
- Locate your hygrometer at mid-height, away from direct humidifier airflow. Sensor placement errors are one of the most common reasons collectors chase phantom humidity swings that are really just measurement error.
Retrofitting a small end-table humidor is a weekend project for a careful DIYer. Building or retrofitting a walk-in against an exterior wall, or running spray foam in a finished room, is where you call in a professional, ideally one who understands cigar storage specifically rather than general HVAC insulation.
Key Takeaways
A cigar cabinet’s relative humidity stays stable only when closed-cell insulation, a continuous vapor barrier, Spanish cedar lining, and correctly placed sensors all function as one integrated system.
| Point | Details |
|---|---|
| Insulation is the vapor barrier | Specify closed-cell spray PU or rigid board, installed void-free, since it insulates and blocks vapor migration at once. |
| Test exterior walls first | Measure interior surface temperature in cold weather before building a walk-in against an exterior wall. |
| Cedar thickness should match the build | Use roughly 1/4 to 1/2 inch of Spanish cedar, thicker for walk-ins, with an air gap behind it and no sealant finish. |
| Sensors go at mid-height | Place your primary hygrometer away from direct humidifier airflow, with a secondary sensor for stratification checks. |
| Verify before you load cigars | Run a 72 hour stabilization test with data-logging hygrometers after any new build or retrofit. |
| Dunn’s Luxury Selections handles the full build | From consultation through white-glove delivery, Dunn’s designs and commissions insulated cabinets and walk-ins so the engineering is done right the first time. |
Table of Contents
- Why Cigar Cabinet Insulation Controls Humidity Stability
- Which Insulation Material Is Best for a Cigar Cabinet?
- How Should the Vapor Barrier Be Installed?
- What Thickness of Spanish Cedar Should You Use?
- How Should Doors, Seals, and Shelving Be Built?
- How Do You Retrofit an Existing Cabinet’s Insulation?
- Where Should You Place Sensors and Fans?
- How Do You Diagnose Condensation, Mold, or Off-Odors?
- What R-Value and Budget Should You Plan For?
- What Do Professional Humidor Builders Know That Forums Don’t?
- Why Insulation Is Non-Negotiable for Serious Collectors
- How Dunn’s Luxury Selections Handles Insulation and Build Projects
- Sources
- FAQ
Why Cigar Cabinet Insulation Controls Humidity Stability
Insulation does not create humidity. It controls surface-temperature variation, and that variation is the single biggest driver of relative humidity swings inside a sealed cabinet. A cabinet wall that is 3°F warmer on one side than another creates a cold spot, and cold spots are where water vapor condenses out of the air rather than staying suspended as humidity.
Picture the interior wall of an insulated cabinet as a temperature map rather than a flat surface. Where the foam fill is complete and uniform, the interior surface tracks close to room temperature. Where there is a void, a gap around a wire pass-through, or a compressed corner where the foam never fully expanded, that spot runs colder. Colder surfaces pull moisture out of the air faster than the humidifier can replace it, so RH near that spot reads differently than RH six inches away. Multiply that across a dozen small voids and you get a cabinet that never quite settles.
Three physical principles explain almost everything that goes wrong with an under-insulated cigar cabinet:
- Relative humidity is temperature-dependent. The same amount of water vapor in the air reads as a higher RH percentage when the air is cooler, and a lower percentage when it warms.
- Dew point is the temperature at which air can no longer hold its vapor and moisture condenses onto a surface. Every RH and temperature combination has a corresponding dew point.
- Vapor moves two ways: diffusion through a material, and bulk air leakage through cracks and seams. Air leakage moves far more moisture, far faster, than diffusion through a solid wall, which is why sealing seams matters more than most builders assume.
Here is the math that should worry anyone insulating against an exterior wall: air at 70% RH and 70°F has a dew point around 60°F. If that exterior wall’s interior surface drops to 58°F on a cold January night, which happens routinely in an under-insulated stud cavity, you now have condensation forming on the very surface holding your cigars. This is precisely the risk that walk-in humidor builders are warned to test for before construction begins, not after cigars go on the shelf.
Which Insulation Material Is Best for a Cigar Cabinet?
Closed-cell rigid foam board or closed-cell spray polyurethane is the right call for nearly every cabinet and walk-in build. Both act as insulation and vapor retarder in a single material, which matters enormously in a humidor, where you are not just blocking heat transfer, you are managing water vapor in a way a standard building assembly never has to. Polyisocyanurate and extruded polystyrene (XPS) are solid alternatives with slightly different tradeoffs. Open-cell foam and untreated fibrous insulation like standard fiberglass batts should be avoided if odor and moisture control matter to you, and for a cigar collector, they always do.
The reasoning behind that recommendation comes down to how these materials behave once installed, not just their spec-sheet numbers.
| Material | R-value per inch | Moisture permeance | Odor/off-gassing risk | Installation difficulty |
|---|---|---|---|---|
| Closed-cell spray PU foam | 6 to 7 | Very low (vapor retarder when full/void-free) | Low once fully cured | Professional equipment usually required |
| Polyiso rigid board | 5.6 to 6.5 | Low to moderate (depends on facing) | Low | Moderate, DIY-feasible |
| XPS rigid board | 5 | Low | Low | Moderate, DIY-feasible |
| Fiberglass batt | 3.1 to 3.8 | High (fibrous, absorbs moisture) | Low material odor, but poor moisture control | Easy |
| Open-cell spray foam | 3.5 to 3.6 | High (vapor-open) | Higher initial off-gassing | Professional equipment required |
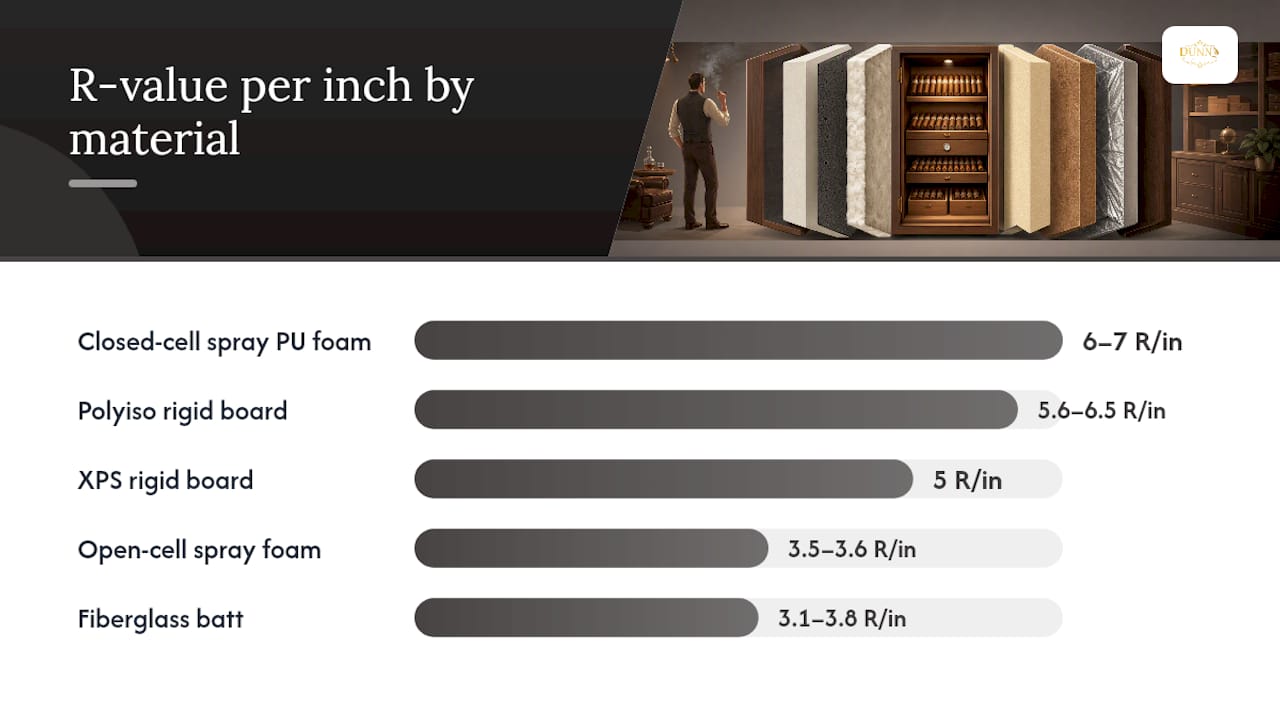
Closed-cell spray polyurethane delivers the highest R-value per inch and, when applied correctly, fills every irregular cavity without seams. That continuity is its real advantage. A deep dive into how humidor-grade foam differs from cold-chain refrigeration foam makes a point worth internalizing: the goal isn’t the lowest possible thermal conductivity, it’s a full, void-free cavity fill that keeps every interior surface at a uniform temperature. A humidor foamed to a slightly higher k-value with zero voids will outperform one foamed to a marginally better k-value with a few missed corners.
Polyiso and XPS boards are the practical choice for collectors building or retrofitting without access to spray equipment. They cut cleanly, install with adhesive and mechanical fasteners, and give you predictable, consistent R-value per inch. Polyiso with a foil facing adds a vapor-retarding surface on top of the foam itself, which is a meaningful bonus if your seams are taped correctly.
Fiberglass and open-cell foam are the materials to avoid. Fiberglass is vapor-permeable and can hold moisture inside the wall cavity rather than blocking it, which is the opposite of what a humidor needs. Open-cell spray foam has real off-gassing during cure and stays vapor-open long after, letting moisture migrate through the wall assembly in ways that undermine your RH stability.
Your decision tree should look like this: for a small desktop or cabinet build, rigid closed-cell board is easiest to source and install cleanly. For a walk-in or an oddly shaped cabinet with lots of corners and penetrations, spray closed-cell PU from a professional applicator gives you the void-free fill that matters most. If you’re retrofitting an existing cabinet with cedar already installed and can’t fully gut it, rigid boards cut to fit behind removable panels are often your only realistic option.
How Should the Vapor Barrier Be Installed?
On a properly built humidor, the insulation layer and the vapor barrier are not two separate systems, they’re one continuous envelope. A consistent closed-cell foam layer or an engineered membrane, installed without gaps, is what keeps humidity inside the cabinet where you want it and keeps ambient room moisture from migrating into wall cavities where you don’t.
Installation sequence matters as much as material selection:
- Frame and inspect the cavity for any gaps, wire penetrations, or structural irregularities before insulation goes in.
- Install the closed-cell insulation as a continuous layer, whether spray-applied or rigid board, prioritizing full cavity fill over speed.
- Seal every seam and joint with a vapor-rated tape or compatible adhesive rated for the specific foam facing you’re using.
- Address every penetration (wiring for humidifiers, sensor leads, hinges) with a sealant that maintains vapor continuity rather than leaving an open channel.
- Verify continuity with a visual inspection and, ideally, an infrared or simple contact-temperature scan of the finished interior surface before you install the cedar lining.
A few materials do double duty here and are worth specifying by name:
- Closed-cell spray polyurethane foam, functioning as insulation and vapor retarder simultaneously.
- Polyiso board with a foil facing, when every seam is taped rather than left as a butt joint.
- A dedicated vapor-retarder membrane in cases where the insulation alone doesn’t achieve full continuity, such as around irregular framing.
Warning: never build a walk-in humidor against an exterior wall without first measuring that wall’s interior surface temperature in cold weather. If the surface temperature falls within the dew-point range for your target RH, you have a standing condensation risk that insulation alone may not fully solve. This is precisely the caution design experts raise about untested exterior walls, and it is the single most common structural mistake in DIY walk-in projects. Test first. Build second.
What Thickness of Spanish Cedar Should You Use?
Spanish cedar lining does three jobs at once inside a properly insulated cabinet: it buffers humidity swings by absorbing and releasing moisture slowly, it imparts and protects the aroma profile collectors associate with well-aged cigars, and it acts as a breathable structural interior over your vapor-tight envelope. Most cabinet builds use cedar in the 1/4-inch to 1/2-inch range, with many collectors and manufacturers converging on roughly 3/8 inch as a practical middle ground between cost and buffering capacity.
Thicker cedar, up to 1/2 inch or occasionally more in premium walk-in builds, buffers humidity more effectively because there’s simply more wood mass to absorb and release moisture as conditions shift. The tradeoff is cost and weight, and diminishing returns set in past a certain point since the insulation and vapor barrier are doing the heavy lifting on stability, not the cedar itself.
A few installation rules separate a cedar lining that performs for decades from one that warps or sours within a couple of years:
- Leave a small air gap between the cedar and the insulation layer rather than gluing it flush, which allows the wood to breathe and move with humidity changes without buckling.
- Use stainless or brass fasteners, never adhesives that outgas, since cigars absorb ambient odors readily and a curing adhesive smell can taint a collection for months.
- Never finish cedar with varnish, polyurethane, or lacquer. Sealing the wood defeats its purpose as a humidity buffer and can introduce off-odors that migrate directly into your cigars.
- Sand, don’t seal, if you want a smoother finish. A light sanding keeps the wood’s natural porosity intact.
Collector forums and build threads consistently echo the same debate: go thicker for a walk-in where humidity swings are larger and the cedar has real buffering work to do, and stick closer to 1/4 inch for a well-sealed desktop or small cabinet where the insulated envelope is already doing most of the stabilizing. The consensus lands less on a single “correct” number and more on matching cedar thickness to how much structural buffering your insulation strategy actually needs.
How Should Doors, Seals, and Shelving Be Built?
Your door is the weakest thermal link in almost every cigar cabinet, and it needs an insulated core, a full-perimeter magnetic gasket, and a compression seal at the threshold to perform anywhere near the level of the insulated walls around it. A beautifully insulated cabinet with a thin, poorly sealed glass door is still a leaky envelope.
Door seal checklist:
- Specify a magnetic gasket rather than a compression-only rubber seal, since magnetic seals maintain consistent contact pressure across the entire perimeter even as materials expand and contract seasonally.
- Build in a full-perimeter compression seal at the door jamb, not just top and sides, since bottom thresholds are the most commonly overlooked leak point.
- If the door has glass, treat it as a thermal liability. Replacing a single glass pane with a layered assembly, glass, air gap, and an inner acrylic panel, meaningfully cuts heat transfer through what would otherwise be the least insulated surface in the entire cabinet, a fix well documented in air-cooled humidor design work.
- Add a secondary interior gasket or “double lip” seal on high-end builds where door sag over time can loosen the primary seal’s contact.
Shelf mounting deserves more thought than most builds give it. Solid shelves block airflow and create dead zones where humidity stratifies. Ventilated shelving, whether slatted cedar or wire-frame with a cedar tray liner, lets conditioned air circulate vertically through the cabinet rather than pooling at the bottom. Space shelves with enough clearance for boxes and bundles without crowding airflow paths, and keep load ratings in mind if you’re storing heavier cedar cabinets or bulk inventory.
Pro Tip: Position your humidifier unit across from your primary sensor, not adjacent to it, and orient the airflow along the cabinet’s long axis rather than blasting it directly at stored cigars. Direct airflow on cigars accelerates surface drying even when the average cabinet RH reads correctly, which is a mismatch collectors often can’t diagnose until wrapper cracking shows up months later.
Circulation fans matter more in taller cabinets and walk-ins, where vertical stratification, warmer, more humid air near the ceiling and cooler, drier air near the floor, becomes pronounced without active mixing. A small, quiet muffin fan running continuously or on a humidity-triggered cycle solves most stratification problems that would otherwise require oversized humidification equipment to compensate for.
How Do You Retrofit an Existing Cabinet’s Insulation?
Retrofitting insulation into a cabinet that already has cedar installed breaks down into three phases: diagnose and prep, install insulation and vapor control, and re-line and commission. Skipping the diagnostic phase is the most common reason retrofits underperform, because collectors jump straight to adding foam without first identifying where the existing envelope is actually failing.
Step-by-step retrofit workflow:
- Remove all cigars and trays to a temporary humidor or sealed storage container before any construction work begins.
- Protect the existing cedar lining with painter’s plastic or removable panels rather than tearing it out, if it’s still in good condition.
- Identify access points where you can reach the wall cavity, whether through the back panel, removable side panels, or the floor.
- Install rigid closed-cell boards cut to fit, or bring in a professional for spray closed-cell foam if the cavity is irregular or inaccessible by board.
- Seal every seam and penetration with vapor-rated tape before closing up the cavity.
- Reinstall or replace cedar lining, adding the recommended air gap behind it if the original installation was glued flush.
- Reinstall trays, shelving, and hardware, then load your sensors before returning any cigars.
Tools and materials: utility knife or fine-tooth saw for rigid board, vapor-rated seam tape, construction adhesive rated for foam-to-wood bonding (never solvent-based adhesives, which outgas and can taint cedar for weeks), stainless fasteners, and a basic infrared thermometer for surface checks. If you’re using spray foam, that work belongs to a professional with proper ventilation and PPE. Off-gassing during spray foam cure is genuinely hazardous in an enclosed space, and it is not a DIY afternoon project.
Verification after retrofit is not optional. Run a 72 hour stabilization test with data-logging hygrometers placed at multiple heights before you return a single cigar to the cabinet. Check surface temperatures at several points on the newly insulated walls during that window, particularly near seams and corners, to confirm you don’t have a residual cold spot from an incomplete fill.
Where Should You Place Sensors and Fans?
Your primary hygrometer belongs at mid-height, positioned away from direct humidifier airflow so it reads ambient cabinet conditions rather than a localized moisture spike. A secondary sensor near the floor or ceiling gives you a verification point and reveals stratification before it becomes a visible problem.
Sensor types and calibration:
- Digital data-logging hygrometers are worth the modest premium over analog dial units because they let you review humidity trends over days or weeks rather than catching only a single-moment reading.
- Salt-test calibration (a saturated salt solution in a sealed container, which should stabilize at a known RH) is the standard DIY method for checking hygrometer accuracy, and it’s worth doing every three to six months even on digital units.
- Follow manufacturer calibration instructions where provided, since some digital sensors include a built-in calibration offset function that’s more precise than a manual salt test.
Airflow recommendations:
- Install a small circulation fan positioned to move air along the cabinet’s long axis rather than directly across sensor or cigar surfaces.
- In larger walk-ins, consider ducting to distribute conditioned air to multiple zones rather than relying on a single point source.
- For active dehumidification needs, particularly in humid climates or rooms without climate control, integrating a mini-split system alongside your humidifier gives you both moisture removal and addition, which is the healthiest combination for a walk-in.
Sensor placement guidance from detailed walk-in humidor build documentation consistently points to the same lesson: taller cabinets and higher ceilings need more circulation planning, not just more humidification capacity, because stratification, not raw moisture deficit, is usually the real culprit behind uneven RH readings.
How Do You Diagnose Condensation, Mold, or Off-Odors?
If you find surface condensation anywhere inside your cabinet, treat it as an immediate failure of thermal continuity or vapor control rather than a minor issue to monitor. Condensation means a surface has dropped below the dew point, and that surface will keep sweating every time conditions repeat unless you fix the underlying cause.
Diagnostic checklist:
- Check exterior wall surface temperatures with an infrared thermometer or contact probe, focusing on corners and seams first.
- Locate cold spots systematically by scanning the entire interior surface rather than assuming the problem is where you first noticed moisture.
- Test for vapor-permeable gaps around penetrations, seams, and the door perimeter, since air leakage moves far more moisture than diffusion through solid material ever will.
Immediate actions if you find active condensation or mold:
- Move cigars to a secondary, verified-dry humidor or sealed container immediately.
- Increase circulation and run active dehumidification if available, to bring ambient moisture down while you diagnose the source.
- Isolate any affected trays or boxes and inspect them individually before returning them to circulation, since mold spores spread quickly in a closed, humid environment.
Call a professional if mold persists after addressing surface temperature issues, if you suspect hidden water intrusion inside a wall cavity, or if the fix involves electrical work near your humidification or dehumidification systems. A collector with a $30,000 cigar inventory has no business troubleshooting hidden wall moisture with a flashlight and hope.
What R-Value and Budget Should You Plan For?
Target an effective R-value in the R-13 to R-20 range for a cabinet or walk-in wall assembly, which is achievable with roughly 2 to 3 inches of closed-cell spray polyurethane foam or 2.5 to 3.5 inches of rigid polyiso board. Beyond that range, additional R-value delivers diminishing returns for humidity stabilization specifically, and your money is better spent on void-free installation quality and vapor-barrier continuity than on chasing a marginally higher R-value.
| Material | R-value per inch | Thickness for R-value around 15 | Typical cost bracket |
|---|---|---|---|
| Closed-cell spray PU foam | 6 to 7 | about 2.5 inches | Mid to high (professional application) |
| Polyiso rigid board | 5.6 to 6.5 | about 2.5 inches | Low to mid (DIY-friendly) |
| XPS rigid board | 5 | about 3 inches | Low to mid (DIY-friendly) |
| Fiberglass batt (not recommended) | 3.1 to 3.8 | about 4 to 4.8 inches | Low, but poor vapor performance |
Manufacturer specifications for cabinet humidors commonly call for 30 to 50 millimeters of polyurethane foam between the outer cabinet shell and the Spanish cedar interior, which lands comfortably within this R-value target for cabinet-scale builds. Walk-ins, with their larger surface area and greater exposure to ambient room swings, benefit from sitting at the higher end of that thickness range.
Budget guidance: a small cabinet retrofit using rigid board insulation and DIY installation typically runs a few hundred to low four figures in materials, depending on cabinet size and cedar replacement needs. A full walk-in insulated build with professional spray foam application, insulated door construction, and commissioned climate control equipment runs considerably higher, often into five figures once you account for framing, electrical work for humidification and dehumidification, and finish-quality cedar lining throughout.
The cost-versus-performance curve flattens quickly past a modest insulation thickness. A void-free, well-sealed R-13 assembly with a properly sealed door will consistently outperform a poorly installed R-25 assembly with gaps and an unsealed threshold. Prioritize installation quality first, thickness second.
What Do Professional Humidor Builders Know That Forums Don’t?
Professional pre-build and commissioning checklist:
- Run a thermal test on any exterior wall before construction, not after, using a contact thermometer during the coldest part of the day.
- Verify full-cavity fill visually or with a probe check at multiple points, not just a glance at the surface.
- Physically test the door gasket seating by running a dollar-bill pull test at several points around the perimeter, where the bill should offer resistance evenly all the way around.
- Validate sensor locations against actual airflow patterns rather than convenience of wiring access.
- Run a full 72 hour stabilization test with data-logging hygrometers at multiple heights before commissioning the cabinet for cigar storage.
Common mistakes that separate amateur builds from professional ones:
- Patchy foam fills where the installer prioritized speed over cavity coverage, leaving voids that only show up as cold spots months later.
- Using open-cell foam in a cabinet or walk-in because it’s cheaper or more available, without accounting for its vapor permeability.
- Finishing Spanish cedar with varnish or polyurethane for a “nicer look,” which seals the wood’s pores and defeats its function as a humidity buffer entirely.
- Ignoring exterior wall dew point risk because the wall “feels fine” in summer, only to discover the condensation problem the following winter.
When collectors want a fully managed outcome rather than a DIY project, this is exactly where Dunn’s Luxury Selections steps in, handling design, insulation material selection, and full commissioning so the guesswork above never becomes your problem to solve at 11 p.m. on a Tuesday.
Why Insulation Is Non-Negotiable for Serious Collectors
I’ve come to see cigar cabinet insulation less as a construction detail and more as an investment decision, on par with which cigars you choose to age in the first place. A collection built over a decade, sourced from allocations you waited years to access, is only as protected as the envelope holding it. Insulation done right is what stands between that investment and a slow, invisible loss to mold, cracked wrappers, or a musty odor that no amount of airing out will fully undo.
I think about one retrofit project where a collector’s cabinet, built against an uninsulated exterior wall in a converted garage, had been quietly running cold spots for two years before anyone noticed the faint mustiness creeping into the collection. The fix wasn’t exotic. It was a proper thermal test, a full closed-cell reinsulation, and a Spanish cedar reline done correctly. The RH swings that had plagued that cabinet for two years disappeared within a week of commissioning, and the collector’s own words afterward were simple: he wished he’d treated the insulation decision with the same seriousness he’d given every cigar purchase that filled the cabinet.
That’s the standard I’d encourage every serious collector to hold themselves to. You research provenance, vintage, and construction before you buy a box of cigars worth real money. Give the box that holds them the same scrutiny.
How Dunn’s Luxury Selections Handles Insulation and Build Projects
If everything above sounds like more engineering than you want to manage yourself, that’s precisely the gap Dunn’s Luxury Selections exists to close. We design, insulate, and commission cabinet and walk-in humidors as complete turnkey projects, so the dew-point testing, foam specification, and cedar detailing happen correctly the first time, without you having to become a building-science hobbyist to protect a six-figure collection.

Our process covers expert consultation on your space and goals, custom cabinet humidor construction or full walk-in builds, professional installation with verified void-free insulation, white-glove delivery, and financing options for collectors who want to phase a larger investment. If you’re closer to a smaller footprint, our Duke Premium desktop and cabinet humidors come with the insulation and cedar detailing already engineered in. Collectors managing larger inventories often start with the Humidor Supreme 29-Unit Commercial Locker or the Bermuda Cabinet, both built around the same closed-cell, cedar-lined principles outlined in this guide.
Reach out for a consultation, and we’ll walk your space, your collection size, and your climate risks before recommending a specific build.
Sources
- Cigar Humidor Cabinet PU Foam, Deep Dive: Why a Humidity-Holding Cabinet Is Foamed Differently from a Cold-Chain Fridge | UREXCEED
- How to Build Your Own Walk-In Humidor | Cigar Journal
- Electric Cigar Humidor parts diagram & bill of materials | BOMwiki
- Design of Air Cooled Humidor (PDF) | K6JRF
These sources go deeper into testing methods and practical build examples than any single article can cover, and they’re worth reading before you commit to a specific insulation approach.
FAQ
What is the 135 rule for cigars?
The 135 rule refers to storing cigars at roughly 70°F and 70% relative humidity, sometimes written as targeting a balance where temperature and humidity together stay in the mid-60s to low-70s range. Consistency matters more than hitting an exact number, since fluctuation is what damages wrappers and accelerates mold risk.
Is 74 degrees too hot for cigars?
74°F is within an acceptable range for most cigars, though many collectors prefer staying closer to 68 to 70°F to slow aging and reduce tobacco beetle activity, which becomes more likely above roughly 75°F combined with high humidity. Manufacturer guidance commonly targets an optimal storage temperature around 21°C, or about 70°F.
How do I keep my cigar humidor at 70 degrees?
Pair a properly insulated, vapor-tight cabinet with a calibrated climate-control unit or mini-split, and place your temperature sensor at mid-height away from direct airflow to get an accurate reading. Insulation quality matters here as much as the cooling equipment itself, since a leaky envelope forces any climate unit to work harder and still deliver uneven results.
Is 60% humidity too low for a humidor?
Yes, 60% RH runs on the dry side for most cigars and can cause wrappers to become brittle and burn unevenly over time. Most collectors target somewhere between 65% and 72% RH, with 65 to 75% cited as the typical optimal range for cabinet humidors.
Can I insulate a cigar cabinet myself?
Small cabinet retrofits using rigid closed-cell board are a manageable DIY project for someone comfortable with basic carpentry. Walk-in builds, exterior wall assessments, and any spray-foam application are better handled by a professional, or by a turnkey provider like Dunn’s Luxury Selections that manages the entire process from design through commissioning.
Recommended
You May Also Enjoy
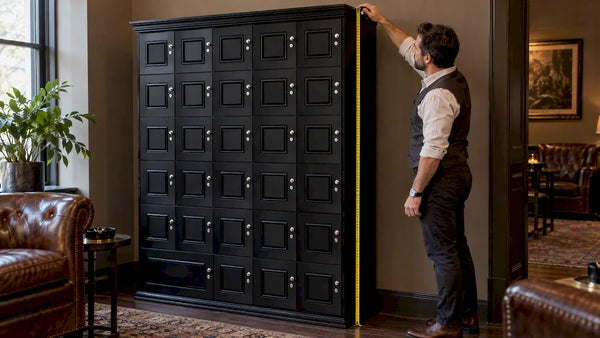
Cigar Locker Dimensions: Sizing Guide for Collectors and Lounges
Cigar locker dimensions explained: compartment sizes, cabinet footprints, capacity math and clearances, so you size a locker bank...
Read Article
Sealing a Walk-In Humidor: Envelope, Door and Penetrations
How to seal a walk-in humidor properly: vapor barrier placement, door gasket, penetrations and the controlled airflow a...
Read Article
Retail Humidor ROI: How to Measure What a Display Earns
What does a retail or lounge humidor really return? A practical framework for cigar shops, lounges and clubs:...
Read Article